Thursday, November 13, 2014

Salt Baked Potatoes

We were at a an event where appetizers were passed around. One of the finger food dishes was baby baked potatoes split and topped with sour cream and chives. Perfect one bite non-messy finger food. They tasted so good, that we just had to them at home. These potatoes are small waxy potatoes - not the kind one usually bakes. So, what to do?
The answer - bake them in a bed of salt. The salt has several effects. It keeps the potatoes off the base of the cooking vessel so that the bottoms don't burn in the high heat of the oven; it seasons the potatoes; it provides some insulation when serving them so they don't cool off too quickly. Also they look quite pretty.


The picture is a "before" picture. We were too busy devouring them to take an "after" picture. We served them with grilled lamb chops, stir fried cabbage, mint sauce and lashings of butter.

Ingredients

Several evenly sized small red/white waxy potatoes (3/4" to 1" diameter)
Enough kosher salt to cover the base of your cooking vessel to the depth of about 1/2 inch

Method

Pre-heat the oven to 425F
Wash the potatoes and pat dry. They don't need to be bone dry. The salt will take care of that
Place the salt evenly in the bottom of a casserole dish. Try and avoid bare metal because salt can be corrosive. I used a Le Creuset casserole dish.
Place the potatoes into the salt bed, pushing down slightly so each potato is abut 1/3 covered. Place the larger potatoes near the edge of the dish and the smaller ones near the center. The edge gets hotter quicker, so they turn out cooked at about the same time.
Put the dish onto the center rack of the oven and cook for about 20 minutes. Turn the heat down to 300 and cook for another 15 - 30 minutes. The time range is there to give you a bit of a margin of safety. They are done before 30 minutes, but they will hold their heat nicely - if for example you forgot to heat the grill for the lamb chops. But that is another story

Sunday, November 9, 2014

Mushroom soup

This month's issue of Fine Cooking had a terrific looking recipe for mushroom soup. However I didn't completely remember the ingredients when I went shopping. No matter, what came out was another "We can serve this to people" accolade from Madame.
What did I do wrong? I was convinced that the recipe said to use dashi - that stock used in Japanese cooking, made from kombu (kelp) and dried bonito flakes. After all, there would be lots of umami resulting from this. I thought it would be interesting to make my own dashi, so I followed Alton Brown's recipe for that.
The recipe actually called for chicken stock. Never mind! I also used more mushrooms than the recipe called for. I did follow the technique carefully - because it seemed unusual to me. I am glad that I did because the result was outstanding.

Ingredients

4t unsalted butter (divided use)
1T olive oil
1t whole cumin seeds
1/2 lb white mushrooms, coarsely chopped
1/2 lb cremini mushrooms, coarsely chopped
6oz oyster mushrooms, coarsely chopped
1/2 cup Negro Modelo beer (or other dark/brown beer)
3 large leeks, white and light green parts only, sliced into thin rounds
2 cloves garlic, minced. 
2 cups dashi + 2 cups water warmed to a low simmer
2 t habanero vodka or other hot sauce
1/4 cup heavy cream
salt/pepper to taste
Torn cilantro leaves as garnish
1/2 t sherry vinegar per serving

Method - and this is where Fine Cooking really shone

Melt 2 t of the butter + the oil in a 6qt pot on low/medium heat. I used the trusty Le Creuset for this and it worked well. When the butter is melted, add the cumin and cook until they brown a little. They should start to become fragrant and nutty. Take care not to burn the butter. 
Add all the mushrooms, turning the meat up to medium high. Cook the mushrooms until they become quite dry. The recipe said 8 - 10 minutes. Mine was more like 12 minutes.
Add the beer and continue to cook until dry.
Add the remaining butter and the leeks, cooking the leaks until soft. when the leeks are soft, add the garlic and cook a while longer - until the garlic is fragrant.
Turn the heat off and add the dashi and hot sauce. Stir and blend (taking care to put a kitchen towel over the blender goblet)  in batches until silky smooth and thick. Return the blended mixture to the original (but now cleaned) pot. Stir in the cream. Over low heat, bring the mixture up to a slow simmer. Adjust the seasoning.
Serve in warmed soup bowls with some drops of sherry vinegar and a few cilantro leaves on top.


Chickpeas and pepitas - a really simple salad

I had read somewhere that a salad made with chickpeas and pepitas would be pretty good. The pepitas give some much needed crunch. But there is always the question of what else to add. So for this salad, some onion, red pepper, pomegranate, Meyer lemon juice and olive oil were the additions. A little habanero vodka for some extra character and it was a thing of beauty. It was a "We could serve this to people" kind of dish.

Ingredients

1/2 a small onion - diced into pieces about the same size as the pomegranate arils
1 pomegranate  - arils only, left intact
1/2 red pepper - diced into pieces about the size of the arils
1 tsp habanero vodka (or other hot sauce)
Juice of one Meyer lemon
2 small cans chick peas/garbanzo beans drained, rinsed and strained
a small handful of parsley leaves roughly chopped
1/2 cup pepitas (toasted pumpkin seeds)
High quality Olive oil to taste (maybe about 1/4 cup)
A few grinds of black pepper
Salt to taste
Large crystal sea salt for added crunch
A few lettuce leaves torn into large pieces.

Method

Combine onion, arils, red pepper, habanero vodka, lemon juice, chick peas, parsley in a bowl. Mix well. Add the pepitas, mix well. Add the olive oil - the chick peas should look glossy. Adjust the seasoning. 
Serve on some lettuce leaves. Add a few large sea salt crystals to taste

Sunday, September 7, 2014

Kitchen Trick - Woody Herbs

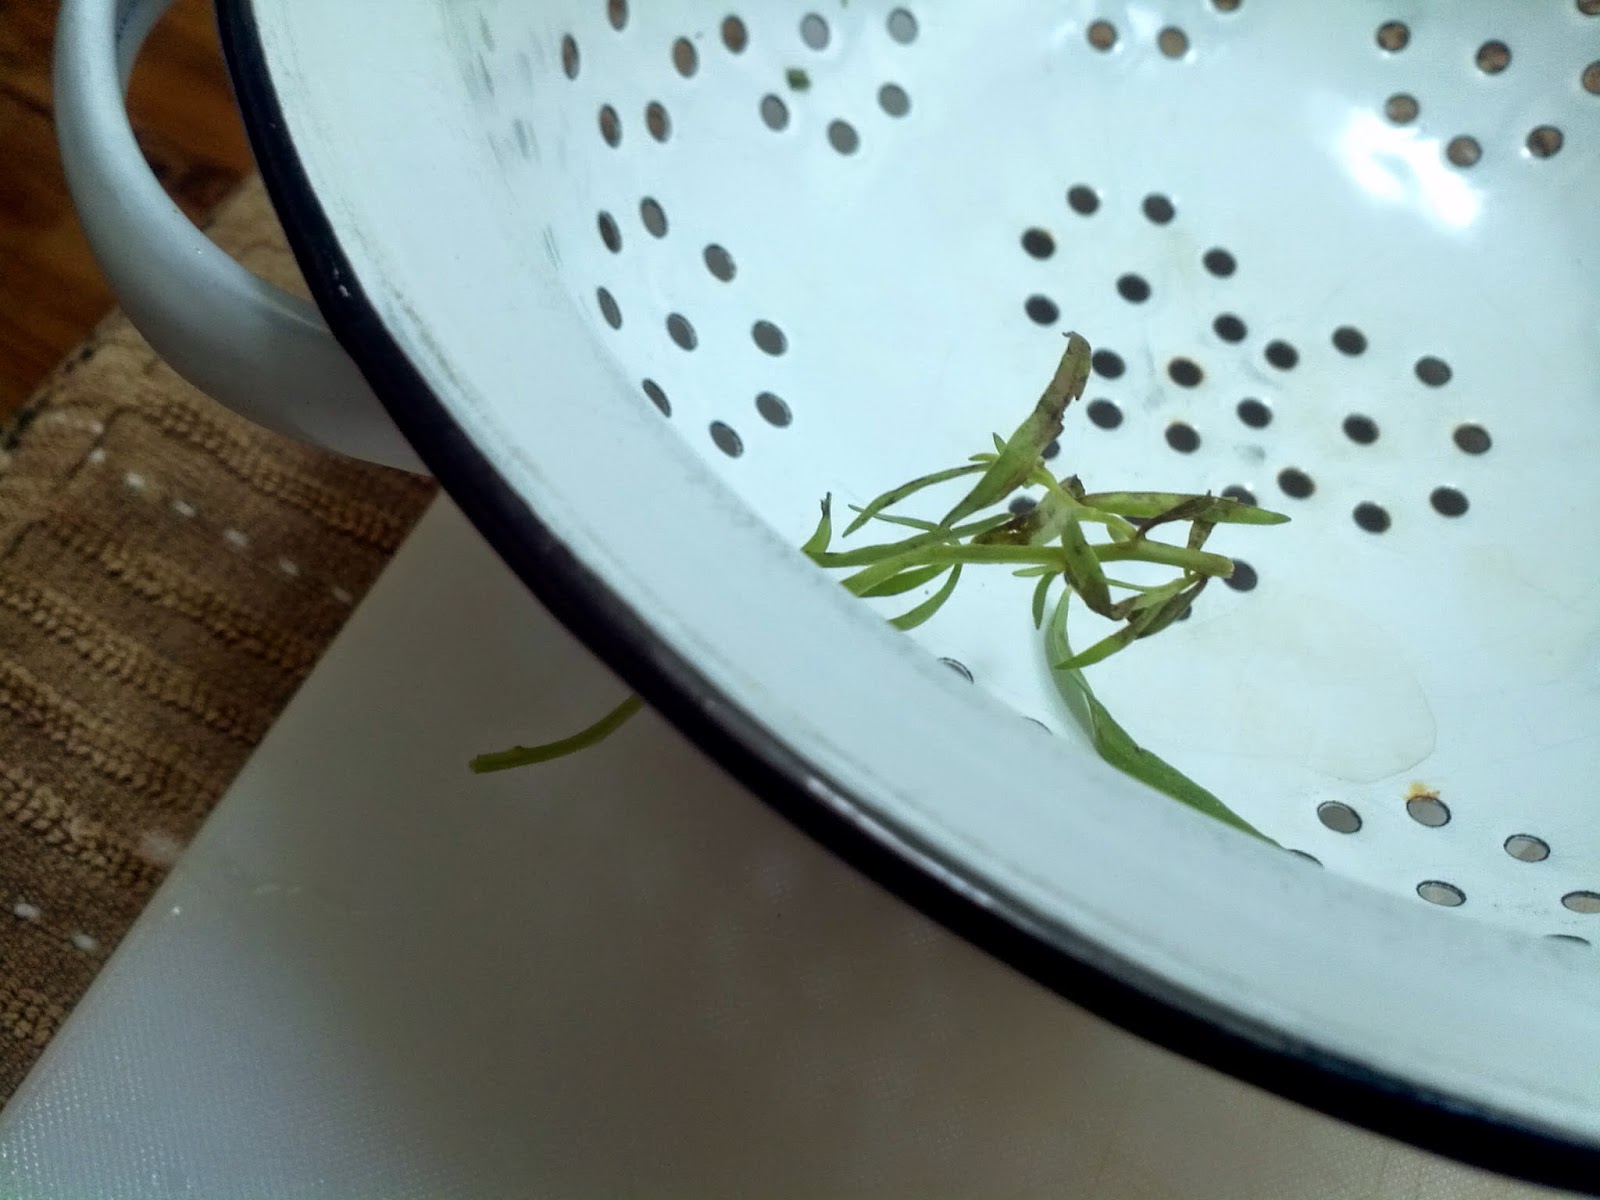
How much of a pain is it to get the leaves off tarragon, rosemary, etc. In my world it is a huge PITA. So I cast around thinking about how to do it. I came up with this when making tarragon mustrd this morning.

I wanted something like the pile on the right while starting with the things on the left


Step 1 - remove the leafy top bits. The stems there won't hurt.
Step 2 Poke the woody bit from the top through a hole in a colander.
 Step 3 Pull the stem through from the outside of the colander leaving the leaves in the colander
The leaves stay in the bowl, and the woody stem comes out cleanly.

Kitchen Trick - Marking Bowls

Do you ever need to know the weight of what you put into the bowl before zeroing the scale? Yeah, I know it shouldn't happen, but I have been caught out a couple of times. My simple cure? I write the weight of the bowl on the bottom using a sharpie. Then if I need the weight of the contents, no need to dirty another bowl - just subtract the weight of the bowl from the total weight.
Of course, being better organized would help too!


Sunday, March 16, 2014

Fresh Bread Every Day

I am lucky enough to have had some  baking teachers. Some of them know who they are, but many don't. In this post I want to acknowledge the people who have really helped my bread making journey. I will probably forget some, but here goes.

My late Aunt Jill used to make all the bread that her family ate. It was whole wheat, sturdy and delicious. She made me realize that it was possible.

Mark Bittman in the NYT for publishing the no-knead bread approach

Daniel Leader for his amazing book called LocalBreads - it really started the ball rolling with the wonderful variety of artisinal European breads. Opened my eyes to what happens when ratios are varied. Introduced me to the world of baker's percentages.

Peter Reinhard on this craftsy course  introducing me to the stretch and fold method of dough making. Suddenly I was able to handle much larger amounts of dough.

Mike Avery at sourdoughhome  for explaining to me why my sourdough starter was leaving me with flat limp dough. And thus helping me make fantastic sourdough.

Clint Cooper of The Village Baking Co. in Dallas for answering my newbie questions so patiently

Ciril Hitz in this video for demonstrating how to shape loaves.

Jeff Hertzberg and Zoë François from Artisan Bread in Five Minutes a Day  (twitter @artisanbreadin5) for the method that ensures I have fresh bread every day.

All in all a very helpful crew! Now I make dough once per week and have fresh bread every day. And it is very good.

The daily bread is mostly small (because I don't have a huge oven) baguettes that I take to work with either cheese, soup (or both!). We also bake a couple of normal (1 1/2lb) sized loaves for toast, etc. Left overs become croutons and breadcrumbs.

Yes I do weigh everything. Yes it is metric. But the ratios are easy.  The Imperial weights are not directly equivalent. I rounded the flour to a convenient amount and scaled everything else accordingly.

 Ingredients

2 Kg  Bread flour (1 use King Arthur)                    5lbs = 1 bag
1.36 Kg room temperature filtered water                6 3/4 cups
14 Gm Rapid rise yeast                                            1/2 oz
44 gm salt                                                                1 1/2 oz (maybe a little more)
a little vegetable oil to prevent sticking

Method

In a large bowl mix the flour, salt and yeast. Add the water and mix thoroughly. Cover and leave to stand for 20 or so minutes to hydrate the flour.
Lightly oil your work surface, turn the dough out onto it and lightly oil the dough. Stretch the dough by anchoring one end to the counter and pushing the dough away from you with the other until about doubled in length. Fold the dough back on itself, rotate half turn and stretch again. Stretch and fold four times. Cover the dough again and allow to rest. 
Stretch and fold following the preceding procedure twice more at 25 (give or take) minute intervals. By now the dough should be smooth and stretchy.
Put the dough into a container that has room for it to double in volume. Leave the dough at room temp until it has doubled.
Take the dough out of the container onto your work surface (do not flour). Stretch and fold once more, form a ball, replace the dough into the container and refrigerate.
When baking you want to have a pizza stone on the upper middle rack and a pan for water on the rack below it. You will use about 1 cup water in the pan.

My morning ritual for making bread for lunch goes something like this:
  1. Turn on oven to 425F
  2. Put water on for tea/coffee
  3. Retrieve dough from fridge and tear off some 175 gm (6 oz) pieces. Roll gently on a floured board and allow to relax
  4. Replace Container in fridge
  5. Make tea/coffee
  6. Form the dough into mini baguettes
  7. Drink tea/coffee
  8. Place dough in couches to rest and rise a bit
  9. Shower
  10. Transfer shaped dough to floured peel
  11. Slit the dough using a razor blade making three lengthways cuts
  12. Place water into the hot pan that is on the lower rack (creates steam in the oven for a better crust), taking care not to scald yourself.
  13. Transfer loaves to oven and bake for 24 minutes
  14. Dress
  15. Pull loaves from oven and place in brown bags for lunch
Start to finish time - about an hour!

Sunday, March 2, 2014

Oysters Bienville

We have some friends who throw a wonderful Mardi Gras party (well it is really more like Dimanche Gras), so we have an excuse to cook a little cajun. This year, we had a quick consultation with Jon Alexis of TJ's seafood in Dallas, and he made sure we had a couple of dozen gulf oysters shucked and ready for us. Antoine's restaurant in New Orleans provided the basic recipe (after all they invented the dish, I think). The whole prep really only took about 35 minutes, then a cooking time of 18. Easy and impressive - oh and tasted fantastic too.

Ingredients (sauce for 24 oysters on the 1/2 shell)

3T butter
1 Green pepper chopped into 1/4" cubes
10 green onions, diced
2 cloves garlic (mashed to a paste)
1/2 cup dry white wine
3/4 cup bechamel sauce
1/2 cup  breadcrumbs
1/4 cup grated cheddar cheese
6 sprigs parsley, leaves only, minced
a few drops of hot sauce (to taste) - I used habanero vodka
24 oysters on the half shell
salt/pepper to taste

Method

Preheat the oven to 400F. Prepare two foil pans (8x13 or so) by filling 1/2 way with rock salt (ice cream salt). Melt the butter and add the green pepper, onions, garlic and sweat until soft (about 5 minutes). Add the wine, bring to the boil and cook out some of the alcohol to reduce the boozy flavor. Stir in the bechamel, pimientos, breadcrumbs, cheese and bring to a low boil. Cook for about 20 minutes until thickened. Check seasoning adding hot sauce, salt, pepper to taste. When cooked stir in the parsley.
Meanwhile nestle the oysters into the rock salt in the pans. Place about 2 tsp of the sauce onto each oyster, taking care not to get the rock salt onto the oyster or into the sauce.


Bake the pans in the oven for around 13 minutes - until the sauce is hot, and the oysters are cooked. Better not to overcook, but do be safe.
Serve in the cooking pans.


Sunday, February 23, 2014

Vegetable casserole (again)

With my new dietary requirements, vegetables playe a much larger part than even before. So we have taken to making a lot of vegetarian dishes. This one is a very pretty casserole with sweet potatoes, leeks, mushrooms, cauliflower, and tomatoes. The trouble with these kinds of casseroles is that the vegetation all cooks at different rates and releases liquids unpredictably. Soggy, tasteless liquid in the bottom of a casserole full of improperly cooked piece parts. Yuk. So this was our attempt to fix that. It got the, "we can serve this to people" accolade, so it must have worked! The saucy flavoring was made from a bechamel - a bit thicker than normal, but plenty tasty. And of course there was cheese - after all cauliflower and cheese are a great combo.

Ingredients - Vegetables

4T vegetable oil
2 medium sweet potatoes, peeled and cubed - 1/2" cubes
3 leeks (white and light green, rinsed and shopped fine)
6 large carrots, scrubbed and sliced into 1/2" pieces
1 head of cauliflower
12 cherry tomatoes
1oz unsalted butter
8 oz mushrooms, roughly chopped and microwaved to extract liquid
1 Recipe cheese sauce (below)
6 T breadcrumbs
salt/pepper - to taste

Method - Vegetables

Pre-heat the milk/onion/cove misxture as described in the cheese sauce.
Pre-heat oven to 350F. Oil a large casserole dish, stir in the sweet potatoes and carrots. Place in the casserole dish in the oven. After about 10 minutes add the leeks and toss together to coat. Leave to cook/dry in the oven for about 35 minutes. 
After 35 minutes, slice the cauliflower (florets only), and toss lightly in oil. Nest the tomatoes in among the vegetables, turn up the oven temperature to 425, sprinkle salt/pepper onto the vegetables. Replace the casserole into the oven. Chop the mushrooms roughly, and put in a microwave safe bow with the butter. Microwave on high for 4-5 minutes. Spoon out the mushrooms (leaving any liquid behind) into the casserole and return to the oven. Start making the cheese sauce (based on a bechamel sauce). As soon as the cheese sauce is made, pour over the vegetables, spread out the sauce, top with breadcrumbs and return to the hot oven for 25-30 minutes.
Remove from the oven when the breadcrumbs are brown and crunchy. Allow to stand for 15 minutes before serving - perhaps with crusty bread....


Ingredients - Cheese Sauce

1 Medium onion, peeled and left whole
24 cloves
1 US Quart whole milk
2oz unsalted butter
3oz All purpose flour
1/4 t freshly grated nutmeg
12 oz grated cheddar cheese

Method - Cheese sauce
Put milk, onion in a saucepan and heat slowly until bubbles form on the surface. Turn heat off, cover and leave to steep for 30 minutes. After 30 minutes, melt the butter over medium heat, and when foaming has stopped, add the flour and cook, stirring vigorously for 3 minutes to cook out the floury taste and make a blonde roux. Do not let the butter flour mixture brown.
Strain the hot milk mixture into the roux while whisking constantly to ensure no lumps. Discard the onion from the strainer. Add the nutmeg.
Bring the roux/milk mixture slowly to the boil allowing it to thicken. Boil gently for about 30 seconds, stirring constantly. Off heat, add the grated cheese and stir in thoroughly.

A sort of screwdriver


Photo: This evening's cocktail. A kind of screwdriver. Blood orange, Meyer lemon, few drops of habanero vodka, a little ginger syrup and absolute citron....


I am allowed to drink alcohol again. We had a modest celebration yesterday with a cocktail. In the house we had some blood oranges, Meyer lemons and the usual array of pantry staples. So, to create an interesting cocktail. Madame is quite the cocktail lover (her favorite of course being, "The Last Word'), but I digress.

Ingredients

4 oz Absolut Citron
Juice of 2 blood oranges
Juice of 1 Meyer lemon
1t habanero vodka
1T Ginger syrup (see this recipe here)

Method

Put plenty of ice into a cocktail shaker. Add the remaining ingredients and shake well until chilled (30 or so shakes). Pour into martini glasses and enjoy. You can garnish with a lemon twist if so desired.


Monday, February 3, 2014

Superbowl Nachos

This is a recipe that is more assembly than cooking. We were invited to a super bowl party and needed something appetizer like and suitable for the occasion. I had made these before (or some variant of them), so was able to recreate fairly easily. The nice thing is that there are some parts you can simply buy, and then just cook the bits that make a difference.

Ingredients

8 oz skirt steak
2T vegetable oil
1 medium yellow onion - diced
1 can refried beans
1/2 cup finely grated Mexican cheese mix
3 pickled jalapenos, sliced thinly (I used Goya brand).
35 Tostito "scoops"

Method

24 hours ahead of time, rub the steak with the spice rub, wrap tightly with cling wrap and refrigerate. An hour before cooking, bring the steak out of the refrigerator, unwrap it, and rewrap into paper towels to dry out.
Saute the onions over just until the edges begin to brown. Remove the onions to a small bowl. Turn the heat up a bit, and add the skirt steak - making certain that the surface was dry.

Cook the meat for about 4 minutes each side - testing doneness as you go. It wants to be cooked to medium.
Once the meat is cooked, take off the heat and allow to rest. Meanwhile start assembling the nachos.
Into each scoop, place 2 pieces of onion, 1/2 tsp of refried beans. 
When the meat has rested, cut it into 1/4" cubes. Place 2 cubes on top of the refried beans in each scoop. Ad a few strands of grated Mexican cheese. Top with a thinly sliced jalapeno round.


Bake in a 350F oven for 8 minutes - or until the cheese is properly melted.

Serve with drained salsa, sour cream and avocados on the side.

Sunday, February 2, 2014

Clams are so versatile

Saturday was a chapter of accidents - I missed a hair appointment, so had to go later. That messed up dinner plans. The French beat the English at Rugby, so I have to have a jeering barrage of French co-workers on Monday. So dinner went from being a nice leisurely affair to an, "How can I do something quick and delicious?" - and something warm because of the weather, fish/seafood based because Madame wanted it...
So the old standby of clams came to the rescue. A trip to my fantastic local fish monger (TJ's on Oak Lawn in Dallas), some minor arm twisting from Jon Alexis there (razor clams and littlenecks), some discussion about fennel and I was off to the races. Jon told me that the razor clams cook quicker than the littlenecks, and to put them in a bit after the littlenecks. I figured that 90 seconds would do the trick - and so it did. Fresh pasta (bought,  this time),  green beans, fennel, shallots tomatoes, white wine..... Oh my. And yes it did get the "We can serve this to people" accolade from Madame.

Ingredients - for the clams

1T vegetable oil
2 shallots, minced fine
1 fennel bulb halved and sliced very thinly (mandoline helps here)   
1 - 1 1/2 cup dry white wine (I used a South African Chenin Blanc called Secateur, procured from Veritas)
1 star anise
1/2 dried cayenne pepper, chopped into flakes (more or less to taste)
6 red cherry tomatoes - halved
6 yellow cherry tomatoes - halved
12 littleneck clams
4 razor clams
salt/pepper to taste

Method 

Heat the oil until just shimmering in a large saute pan(choose a pan that has straight sides and a well fitting lid if possible.) Add the shallots and fennel, cook gently until translucent. Add the white wine, dried cayenne, and star anise and simmer uncovered until some of the alcohol has boiled off. There will always be some left. Add the halved tomatoes, cover and simmer over low heat for about 15 minutes (until the fennel is tender). Remove the star anise.
Add the littleneck clams and cover. Cook for 90 seconds, then add the razor clams. Cook until all clams are open.
Serve with fresh linguine - cooked al dente, and green beans. Garnish with fennel fronds.

Ingredients - green beans

24 green beans cut into 2" pieces.
1T unsalted butter
1/4 cup water
salt/pepper to taste

Method

Heat the butter over medium heat until it stops foaming. Add the beans, toss to coat. Continue to cook until the butter just starts to turn brown. Stop the butter from burning by adding the water and immediately cover the pot and simmer for 3-5 minutes. Uncover and allow the steam to dissipate. Serve immediately.

Saturday, February 1, 2014

Kombucha "Ginger Beer"

Ginger beer has been one of my favorite drinks for as long as I can remember. It requires this mysterious "plant" that you feed with ginger and sugar - somehow it magically transforms these simple ingredients into a delicious drink. Since I started making kombucha, I figured that the SCOBY looked a bit like I imagined a ginger beer plant to look. I say imagined because I never actually got one to work.
My thought was, make the kombucha, draw some off, mix with ginger syrup, bottle with 2 cloves per bottle and age for a week to get the secondary fermentation going.
I tried it and it was outstanding. Now the only flavor I make.

Ingredients

1 gallon of kombucha made as in linked recipe
2 pints ginger simple syrup
10 cloves

Method

Mix the kombucha with the ginger syrup. To each of 10 Grolsch style beer bottles add 2 cloves. Top up the bottles with the kombucha/ginger mixture. Seal the bottles, and leave to ferment for at least a week.
To serve, pour the mixture into a large glass. You may want to strain out the cloves. 


Sunday, January 19, 2014

Bitter orange marmalade

Marmalade is a staple of English breakfasts. We Brits prefer it to be made with  bitter (Seville) oranges. These are only in season in the Northern hemisphere for a few weeks in January. So you have to strike quickly and make a lot if you want to have enough for the year - and for the inevitable gifts when people discover what you are making.
There is a kind of master recipe for this - identifying basic technique, quantities of ingredients, cooking time, doneness, etc. But you can get some interesting variations by changing the kind of sugar you use and the kinds of lemons.
This year, I made 2 batches - totaling about 20lbs. The first batch I used all granulated white sugar. For the second batch I used jaggery (Indian raw can sugar)  for some of the granulated sugar. The photographs in this posting come from the jaggery-based version. The amounts are all metric.

Ingredients

1.2 Kg whole Seville oranges
300 gm whole lemon (I used 2 Meyer lemons)
3 Liters water
2.2 Kg sugar (When I used the jaggery, I used 1.9Kg granulated and 300 gm jaggery)

Method

Wash the Seville oranges and Meyer lemons. Cut each in half around the equator. Place some cheesecloth over a strainer and rest the strainer over a non-reactive bowl. You will be collecting the orange pips (seeds) in the cheesecloth. These pips contain a lot of pectin - necessary for getting the marmalade to set.
Using a reamer, juice the oranges and lemons into the cheesecloth, catching all the pips.

 Seville oranges have a lot of pips! Don't tie off the cheesecloth until after you have cut up the oranges into strips.
In another bowl, weigh out the sugar. In the picture below, you can see some larger pieces of jaggery
 Cut each orange (and lemon) half into quarters. Then slice the quarters into thin strips. As a reference, I get 12 - 16 strips out of each quarter. Don't worry too much about pith, bits of orangle flesh. However if you do discover some extra pips, add them to the cheesecloth
 When you have chopped up all of the oranges and lemons, tie up the cheesecloth containing the pips, so that none of the pips can escape.
 Add the sliced oranges and lemons, the water and the pips pouch to a large pan. Tie the pouch's string to the side handle if any to stop it from falling into the pot.


Gently the simmer the pot for about 90 minutes - until the orange peel is completely soft. Remove the pouch, and allow it to cool.
Meanwhile, add the sugars to the pot and stir until completely dissolved. This is very important. Your marmalade may prematurely crystallize if you do not do this.
After it has cooled sufficiently, queeze the pouch containing the pips into a bowl. There should be plenty of thick, pale orange liquid. This is the pectin and is necessary for the marmalade to set.
Add the pectin to the pot containing the oranges and dissolved sugar. Bring to the boil, stirring frequently. Once the mixture is at the boil, boil for at least 15 minutes. Ideally you want the liquid temperature to rise to 224 degrees (F). Once you are happy with the texture of the marmalade, you can place it into jam jars. However, wait a few minutes after turning the heat off, otherwise the peel will float to the top after the marmalade has been jarred.
Use whatever normal method you employ for sterilizing, heating and sealing jars. If using Ball jars, headroom should be between 1/4 and 1/2"
Allow to cool, and store in a dark place until ready to use. This marmalade will "keep" well for at least a year.