Tuesday, December 6, 2011

The Cookie Exchange

Madame's mixed doubles tennis team is doing a cookie exchange this week. The rules are that she must bring 2 dozen cookies, and several copies of the recipe. When everyone leaves, the recipes are shared and the cookies divided among the attendees so everyone gets to try some of every cookie. As the household cook (although Madame is actually a better cookie maker!), I am tasked with making the cookies. I suppose it is a punishment for being in a tropical place when everyone else is freezing body parts off.
These cookies use bits of Heath Bar brickle to give them a nice toffee taste. Lots of butter and sugar (of course) and oats to make us think there might be something vaguely healthy nearby.


Ingredients (2 dozen cookies)
1 cup unsalted butter at room temperature
3/4 cup granulated sugar
3/4 cup light brown sugar
1 large egg
1 tsp vanilla extract
1 1/2 cups all purpose flour - sifted with the baking soda
1 tsp baking soda
1 1/2 cups oatmeal (not instant)
1 cup zante currants
1 8oz package of Heath Bar brickle

Method
Cream the butter and sugars until they are light and fluffy. Best done in a stand mixer unless you are feeling quite strong. Beat in the egg. Mix in the vanilla. Add the flour slowly and mix carefully to incorporate. Add remaining ingredients and mix to combine.
Divide into 3 equal (about 1lb each) pieces. Form each piece into a log about an inch in diameter. Refrigerate for about 30 minutes.
Divide each log equally into 8 pieces. Place 8 pieces at a time onto a parchment covered baking sheet. Bake at 350F for 8-10 minutes - until golden brown. Remove from the baking sheet with a spatula, and transfer to a wire rack to cool.


Monday, December 5, 2011

Dinner theater

Last Saturday, Chef David Gilbert and I cooked for some high powered business women at my house. Madame was of course a guest. It was fun to be able to ask her not to help - at least during the event itself, She, of course, was her usual wonderful self beforehand (setting a beautiful table) and afterwards cleaning up the 48+ glasses, 56+ plates and the various cooking utensils required for a theatrical 4 course meal with appetizers and coffee/chocolates and liqueurs.
For me it was a chance to cook again with my good friend Chef David Gilbert. For him, a chance to trial some dishes that he will use at a later occasion. For the guests, an elegant party where they could let their hair down, have great food and appropriate wines.
The main theme was "modern Thai" although we deviated a bit. Thai cooking is often difficult to pair with wines because the core elements of Thai cooking simply aren't terribly wine friendly. So we used Thai accents on some familiar ingredients and then added some extra flourish.
It's not that easy to completely silence a table of 8 people, just with the presentation of food. But we did. A stunning achievement in the service of the dessert.
Most of what we did can be found at the Beyond The Kitchen (BTK) blog - Dave's online location for his cooking, eating and travel experiences. However there are a couple things that didn't make it there.

The first is the wine pairings - I mentioned them in the BTK piece, but didn't show them, so here they are:

  • The first course had the Gewurtztraminer - since the soup had the sweetness of some roasted garlic, we wanted to make sure the wine didn't fight with it.
  • For the scallops, a bone dry Sancerre did the trick
  • For the beef a well aged Haure Cotes de Beaune worked well. It had lost its youthfull fruit (such as it was!), and had developed into a mature long, slightly leathery wine that developed beautifully as it opened up. 
  • For dessert, the Ume blanc from Japan. A low alcohol (around 7% v/v) it, again exhibited the sweetness required for the dish.
 Many of the dishes used kaffir (Thai) lime leaves. We have had a kaffir lime tree for almost 10 years - so much so it feels like a family pet now. It gets cold here in the winter, so he has to come inside. However, he is getting to be a bit tall. At over 8feet now, he is going to have to be cut back next year.
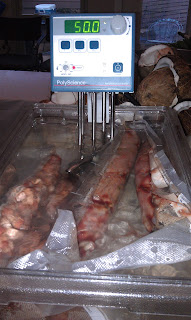
In the BTK post, I mentioned the torchon of foie gras. Here it is in the circulator getting its 20 minutes of warmth.
The parsnips were also done in the circulator, so here they are coming up to temperature.
Last but not least, the beef roulade - also in the circulator.
The temperature of 50C is the upper end of the range for ensuring that the meat tenderizes. It comes out pretty unappetizing looking on the outside, so needs to be seared. The results can be seen on the BTK blog.

Monday, November 28, 2011

Lemon Bavarian in the form of a cold souffle

We often need a desssert dish to take to parties - something that will stand up to being driven to the party, look and taste fantastic. Bavarian creams are good for this because they are light and foamy, yet stable because of the addition of some gelatine.

This recipe is a slightly awkward size because it fits into a 1 1/2 quart (US) souffle dish. That is about 2 1/2 pints in the UK. I dare say it scales back OK, but after much fiddling this appears to be the best balance of all. Lots of lemon flavor. The zest contributes as much as the juice does. I use a microplane for the zest - it delivers terrific flavor at little effort.

Ingredients
5 or so lemons yielding 3/4 cup (6 fl oz.) strained juice
The zest of the above lemons. Note that it is better to zest the lemons before juicing them
1 1/2 packets (3/8 oz) unflavored gelatine - that's the inconvenient bit!
1 cup + 3T granulated sugar
1 1/2 C whole milk
a few grains (very small pinch) of fine salt
8 eggs separated and at room temperature. Use 8 whites and 3 yolks
1/2 t corn starch
1 1/3 c heavy (whipping) cream - chilled

Tips and Tricks
I like to make sure that there are no traces of grease on the whisking equipment before whisking the eggs. So I moisten a paper towel with a little cider vinegar and wipe the inside of the bowl and the whisk with the vinegar. It doesn't impart flavor, but it does a nice job of degreasing.

The egg whites should be room temp (not refrigerator temparture) for maximum foam.

When separating the eggs, you need 4 (yes 4!) bowls. Because traces of any fat cause the eggs not to become nice and foamy, you want to reduce the risk of egg yolk getting into the mixture. Calling the bowls 1-4, here's the procedure. Bowl 3 is the bowl in which the egg whites will be beatem
  1. Crack an egg (on a flat surface, preferably). Separate the white into bowl 1 and the yolk into bowl 2
  2. If the white is clear and uncontaminated transfer from bowl 1 to bowl 3.
  3. If not, discard the white from bowl 1, clean bowl 1 thoroughly and repeat from step 1.
  4. Repeat steps 1 - 3 for the next 2 eggs. You will have three whites in bowl 3 and three yolks in bowl 2
  5. Repeat steps 1-3 for the remaining eggs, but put the yolks in bowl 4. You will now have 8 egg whites in bowl 3, 3 yolks in bowl 2 and the other 5 yolks in bowl 4.
Cream should be cold prior to whipping, so I put mine in the freezer just before putting the gelatine onto the lemon juice.

Prepare the souffle dish by making a foil collar standing about 2 inches (5cm) above the rim. Secure the collar to the dish with a little sticky tape,

Method
Zest and juice the lemons keeping the juice and zest apart in non-plastic bowls. Sprinkle the gelatine on the juice and allow to rest while the next steps are happening.
Put 3/4 c of the sugar,  all of the whole milk, and the salt in a pan and heat gradually, stirring, until the sugar dissolves and the mixture is hot (steaming, but not boiling).
Whisk the egg yolks with the corn starch and 3T of the sugar until pale and thick.
When the milk is warmed, add slowly to the egg yolks whisking constantly. The cornstarch helps prevent the mixture from cooking the eggs.
Return the mixture to the pan (I rinsed the pan out, to ensure that any liquid adhering to the inside didn't burn). Put on low heat and cook, stirring constantly until the mixture has thickened. Adjust the heat while doing this so it doesn't happen too quickly, but also doesn't drive you nuts waiting. Once the mixture has thickened, strain into a bowl, and immediately add the lemon juice/gelatine and the lemon zest. Whisk to incorporate the juice/gelatine into the custard. You need to work fairly quickly, to make sure you don't get lumps of gelatine.
Place the bowl of lemon custard into an ice/water bath (a larger bowl) and stir occasionally to chill thoroughly. Meanwhile whisk the egg whites (and they whisk better when slightly warmed) - first relatively slowly to make them foam, and then on high speed - adding the rest of the sugar slowly. They should be slightly stiff peaks. You do not want them dry. Take a couple of mounds of the egg white and stir into the lemon custard. Once incorporated, add the remaining egg whites in 3 additions. Fold each addition in carefully so as not to deflate the foam. Once all of the egg whites have been incorporated, whip the cold cream to soft peak consistency. Stir the cream (also in 3 additions) into the egg white/custard. Do this very gently also, so as not to deflate the foam. Make sure there are no white streaks left.
Spoon carefully into the souffle dish and chill in the refrigerator for at least 2 hours - and up to about 4 or 5 hours.

Serving
When it comes time to serve, remove the foil collar gently - it feels like you are peeling it off. Do not try to lift it. The Bavarian will stand up above the edge of the dish, and look very impressive.
Garnish with some contrasting colors. I used purple and green basil flowering stalks laid in a pattern on top of the dish. This hides blemishes on the top surface.

On a previous occasion, I had made this dessert and used a simpler garnish - some candied lemon people (lemon peel cooked in sugar syrup for about 90 minutes) and a few rosemary tops. I am placing this photograph here, since the gannets dived into the one from this recipe before I could whip the camera out!

Wednesday, October 5, 2011

A surplus of tomatoes

It is close to the end of tomato season, but I was able to snag 6lbs of seconds at the farmers' market last weekend. As usual they were all over the map in terms of shape, ripeness and quality. But no worry there, I had the trusty grill (which I had just spent all weekend cleaning), the Blendtech, a lot of Anaheim peppers, etc. So this dish is a variant of tomato soup, using ideas from other things along the way. The blackening of the tomato skin imparts a really smoky flavor to the soup. But do take care not to get mch of the blackened skin into the soup.

Ingredients
6lbs ripe tomatoes (beefsteak or other large size, divided use)
4 small new onions (about 1 1/2 lb in total)
3/4 cup toasted almond slivers
8 Anaheim chile peppers
2 cloves garlic (sliced thinly)
1T sherry vinegar
kosher salt
pepper

To Serve
Large crystals sea salt
1 small cucumber diced small (brunoise)
2 Anaheim peppers (diced small)
Sherry vinegar
Extra virgin Olive oil
6 fresh basil lives, chiffonade

Method
Heat the grill for about 15 minutes on the low setting (or use a small charcoal fire). My gas grill registered 550 on an oven thermometer suspended above the burners. Place 3/4 of the tomatoes on the grill and leave for about 45 minutes. The skin will blacken and become crunchy. At the same time place the onions unpeeled on the grill. Their skins will also blacken.
After the tomatoes have cooked through, they will be thick and concentrated inside. Extract the concentrated flesh into a bowl. Do the same for the onions. Meanwhile toast the almonds in a hot, dry pan - taking care not to burn them. Roughly chop the 8 Anaheim peppers, peel the remaining tomatoes. Place peeled tomatoes, concentrated tomatoes, onions, almonds, garlic, 1T vinegar into the blender and blend until very smooth. Add a little kosher salt and pepper to taste.
Chill the soup mixture for several hours in the refrigerator.

Serving
Serve the soup in a plain white bowl, garnished with the diced cucumber, Anaheim peppers and basil chiffonade. Sprinkle on some sherry vinegar, drizzle a little olive oil, sprinkle sea salt and basil. Serve with crusty bread.

Note this gets the "We can serve this to people" accolade, so it is definitely one of Madame's new favorites.

Wednesday, September 28, 2011

Pork with kale and beans - thanks to "the Chew"

I have to admit it, I watched some of the first episode of "The Chew" a daytime talk show on ABC in the USA. It features several excellent chefs - including Michael Symon who has inspired me before. This recipe is based on the recipe he did on the show, but with some minor tweaks which aren't terribly material. The goal was to make a dish that comes in at less that $7 per serving. This made that easily. For approximately $4.50 per serving, this lovely dish came out.

This recipe was to serve 2 people.
Ingredients
2T grape seed oil (or other neutral oil)
2 pork loin chops (about 5oz each), pounded thin (1/3 of an inch thick)
6 pieces of pancetta
a little parsley
salt/pepper for seasoning
a little flour to dust the meat
1 shallot minced fine
1 garlic clove sliced thinly
1 minced cayenne pepper
1 small can canellini beans (rinsed and drained)
1 bunch of kale, leaves stripped from the stalks and shredded
1/4 cup chicken stock
juice of 1 lemon

Method
For each piece of pork, lay it flat on the board. place 3 pieces of pancetta on each piece of pork. Add a little parsley. Fold the pork over the pancetta and pinch the edges closed. Salt and pepper the pork on both sides. Sprinkle lightly with flour. heat the oil in a skillet until shimmering. Place the pork pieces into the hot oil and fry about 3 minutes on the first side, turn over and fry 2 more minutes. After turning the meat, add the shallots, garlic, cayenne pepper and fry gently until softened. remove the meat from the pan, and add the washed jale. Stir and add the drained beans.Add the chicken stock and simmer until the kale is tender, and the beans warmed through. Add lemon juice and serve immediately on warmed plates.

Monday, September 26, 2011

A sauce for empanadas

There's a wonderful Empanada shop near where we live. It has become the go to place for appetizers for some of our bigger parties. Yesterday we had about 40 people over, and as usual bought empanadas. But this time I wanted to have a little sauce to go with them. The empanadas were beef, ham and cheese, and spinach. I figured something green and herbal would work, so came up with this (after scouring the internet).
Ingredients
Half a dozen or so green onions minced
4 garlic cloves - minced very finely
Juice of 2 lemons
1 bunch cilantro chopped pretty finely
2t ground cumin
4T sugar
1/2 cup vinegar (I used white distilled, but I imagine cider vinegar would be fine too)
Salt (if desired, to taste)

Method
Combine the onions and garlic in a non-reactive bowl. Mix in the other ingredients, stir and refrigerate at least 2 hrs - preferably overnight. If the vinegar doesn't cover the vegetation, add a little more.

Friday, September 9, 2011

Plum pickle

On a road trip to Houston recently, Madame and I stopped  in Fairfield to eat at the mighty fine Sam's restaurant. The breakfast buffet is huge - makes fgreat road food. As we were leaving we noticed a roadside stand selling peaches, plums, potatoes - some things grown by the farmer, some imported (California strawberries). You have to know what's in season. Strawberry season in Texas is March/April - not the end of August!

Anyhow, we bought some fantastic peaches, some OK tomatoes, and some ammunition - oh wait they were plums, but as hard as bullets. You may wonder why. Well, I hoped they might ripen up a bit. They did, so now they were rubber bullets and not the deadly kind. The only thing to do was to make some kind of a chutney. I did - and it was surprisingly good. Especially with pork chops. It is tart enough so that it cuts through the pork fat well.

Ingredients
1 whole star anise
6 whole green cardomoms
12 coriander seeds
12 black pepper corns
2 whole cloves
1/2 Kaffir lime leaf
2lb small, unripe plums - whole with stones, washed but not dried
1/4 cup red wine vinegar
3 T agave nectar (more or less depending on taste)
pinch of salt

Method
Make a spice bag out of a piece of cheesecloth (muslin) and the first 6 ingredients. You don't have to do this but it meakes fishing the spices out afterwards a breeze. Put the spice bag and the rest of the ingredients in a sauce pot, bring to a simmer, and cook stirring occasionally for about 45 minutes - until the plums have lost most of their texture.

Remove the spice bag. Leave to cool. Transfer to a screw topped jar, removing the plum pits as you transfer it. Store tightly sealed in the fridge for a couple of weeks.

Sunday, August 21, 2011

baba ghanouj, ganoush, ganush - how about eggplant dip!

This recipe is inspired by a couple of my favorite food TV folks. America's Test Kitchen and Alton Brown. About 2 minutes in to the attached AB does something very clever with the eggplant! This dip is not terribly labor intensive and absolutely delicious with some warm pita and olives. The ATK recipe comes from 2001, I think

Ingredients
2 large eggplants (aubergines, melanzane) rubbed lightly with vegetable oil
1T Tahini
2 cloves garlic made into a paste (a garlic press is the easiest way)
1T Extra virgin olive oil
1T fresh lemon juice (more or less to taste)
salt, pepper to taste

Method
Turn the grill on to high (or if using charcoal, get a good fire going. You want lots of heat for this). Let the grill heat for 15 min or so. Meanwhile wash the skins of the eggplants, pat dry and lightly coat with vegetable oil. Pierce the skin of the eggplants with the point of a sharp knofe about 60 times - all over.
When the grill is nice and hot, place the eggplants directly on the bars over the heat. Grill for about 40 minutes turning occasionally. The skin will blacken and juices will run out. They almost collapse.

When they are nice and black and collapsed, transfer to a rimmed dish and allow to cool. Once they are cool enough to handle, wrap each egg plant in cling wrap. Then snip the stalk end off the eggplant, squeeze the flesh out into a strainer. This is illustrated 2 minutes into the Alton Brown video. This technique is so much easier than trying to slit the skin and scrape out the flesh.

Once it has drained for about 5 minutes, discard the liquid and put the flesh into a bowl. Add the tahini, garlic and olive oil and mix thoroughly with a fork. Add the lemon juice, mix and taste. Add salt/pepper until it has the desired level of seasoning. Refrigerate 6+ hours and serve.

Saturday, August 20, 2011

What is missing from most grilled cheese sandwiches

It's funny how grilled cheese sandwiches often don't involve a grill. The grill is the secret to a really tasty sandwich, and doing a couple of unusual things makes a big difference too.
In this version of the grilled cheese sandwich, the bread is grilled on both sides - with three cooking actions.
Madame did deliver the "we can serve this to people" accolade, so Iguess she liked it. Of course with ripe tomatoes, home made bread, fantastic olive oil brought home from an olive grove in France and decent cheese, it is hard to go wrong.
Ingredients
4 slices of bread - preferably rustic and home made, 1/3" thick
Good quality olive oil (unmeasured - the method will describe how to use it)
6 slices of cheese (I used thinly sliced Swiss cheese)
1 tomato thinly sliced
2 Scallions thinlly sliced
Salt and pepper to taste

Method
Get the grill nice and hot. I used the gas grill on high for about 5 minutes. Then turn the heat to low. Paint each side of each piece of bread with a little olive oil. Essentially a small quantity evenly spread. Prepare the sandwich filling and head for the grill.
Place the bread slices on the hot part of the grill, and allow to cook until lightly browned and a little crunchy. This first browned side becomes the inside of the sandwiches.
As soon as the first side is browned, flip the bread over so the uncooked side is on the grill. Working very quickly, place a layer of cheese, a layer of onion, a layer of tomato and another layer of cheese on 2 of the slices. Top with the other 2 slices - ensuring that the first grilled side is on the inside - against the top layer of cheese.
Grill until the bottom of the sandwiches are nicely brown, then flip the sandwiches so the other ungrilled side is now against the grill bars. Cook until that side is nicely browned too.
Remove from grill, cut each sandwich in half, sprinkle with salt and pepper. Serve hot.

Friday, July 8, 2011

Chateau des Poccards

Oh dear this is turning into a travelogue and not a foodalogue. But I must pay homage to the Chateau des Poccards in Hurigny, just outside Macon. We chose to stay there because it was close to our friends and it looked nice. It was and it was!
The owners (a Belgian couple Erik and Erika Bruyneel) bought the place at the end of 2010. It is a large house with gorgeous grounds and a nice (cold for us Texans though) pool. It is just so civilized.
On arrival at about 6pm, we were greeted by Erik who eplained things simply. There's a place for the room keys in a box at the bottom of the stairs. It's best to put the key there - just like in an old fashioned hotel. Then up to the room which was just lovely. Comfortable bed, extra pillows, wine glasses, recently renovated bathroom. Enough towels, plenty of hot water....
So we unpacked and went down to the salon. Dvorak playing softly. Fred met us and we had some wine - Erik has a cellar with local products - white whines from the Macon region. The price per glass? Ridiculously inexpensive. We almost felt that we were visiting friends - even though it was clearly a commercial transaction. The owners hit the balance perfectly.
Discussion of where to eat, and Erik called to make reservations - so when we arrived at the restaurant we were greeted very warmly. Not surprisingly, Erik and Erika rocked up to the same restaurant about 30 minutes after us.
But now for the really special bit. I screwed up. We wanted three nights, they only had 2 available. I had been corresponding with another place too, and the other place had 3 nights available. However, I got the places mixed up. The Chateau des Poccards was fully booked the Saturday night - but Erik/Erika somehow made it work and we were able to stay. That is generous, human, and wonderful.
Being a small chambres d'hotes place, they don't take credit cards, so cash (from the ATM) was needed. No problem we established that early and all was well.
If you are heading to the macon region, stay here. It's that good!

Thursday, July 7, 2011

seabirdskitchen and all things goat

On our trip to the Macon region, we spent time with local friends. That's the way to experience a region! So we enthusiastically supported the idea of the "goat milking entertainment". One of the family members has a friend who runs a farm. And on that farm he had some goats... Anyhow, we weren't sure what the entertainment would be, but were game for anything.

We met "at the fountain" in Blany - a small speck of a town with a public oven and Marc's farm, a bar and a bend in the road. A trek though the fields, and then down to the milking shed to meet Marc, the goats, the border collie and the cat. The dog gets wildly excited with the thought of the daily milking, so when she was let off the leash, she exhibited the boundless energy that a border collie has, together with the herding instincts and absolute discipline. The cat was properly aloof and hissed and spat when the dog came too close.


The first batch of goats (18) of them were let in to the milking stall, where they were hooked up to the machine. The cat placed herself on guard and the process started. It takes about 10 minutes to milk the batch of goats. Somehow the dog knew when they were done, because she got very excited at the thought of herding them back to their pen. Feed stations were filled and the next batch were set up. A total of 4 batches of goats, so we were in the hot shed with the goats, each other, the flies, the dog, the cat, and who knows what else for about an hour and a half. Wouldn't have missed it for anything.


After the milking was done, we sauntered to Marc's house, went into the cheese shop where his wife sells the goat cheese made only from their goats and showed us all the varieties they made and all the stages. Then to their patio to try the various cheeses, drink some local wines (including a nice cremant) before dinner. We left there at about 10:30 and started dinner at Dominique and Daniel's house in Tournus at 11 or so.


Wednesday, July 6, 2011

Seabirdskitchen visits Georges Blanc

Madame and I have been on vacation in France. There'll be other posts, but the pride of place goes to our fantastic evening at Georges Blanc's restaurant in Vonnas.

In some ways, Chef Blanc is "phoning it in" - everything is not picture perfect and the wine service was shockingly bad. That didn't detract (much) from the experience - it dis remove a fairly hefty item from the bill, since we didn't get to order another bottle. With the fairly ordinary Chablis (if there is such a thing!) running at $150/bottle we knew we were in for a pricy evening.

When we arrived we were served the house signature summer cocktail - a cremant with fresh raspberry juice instead of cassis. Intense flavor, pretty color, a perfect start sitting outside near the small river. With the drinks there were appetizers - a little smoked salmon on a cracker perfumed with orange and ginger, and foie gras pressed to look like orange segments, again with some dried orange zest. Talk about a mouth explosion.

Inside and an amuse of langoustine on avocado puree (yeah, I am not doing it justice) for Madame and Fred. Some caviar and asparagus for me (crustacean allergy prevents the langouste).

We must have spent almost 30 minutes with the menu.


I had the fondant de blanc de poulard de Bresse marbre de foie gras... strips of foie gras with local Bresse chicken meat in a gelee between. Quite spectacular. Madame had the crab and oysters - the oyster brine was turned into a gelee and perfumed with some lavendar. The crab tower was wonderful. Fred had the minute de bar napee... Wow, a beatiful piece of fish on a rich vegetable reduction finished with olive oil.

For the plats Both Fred and Madame chose the signature poulet de Bresse. Geroges Blanc is known for this - and in Heston Blumenthal's book, "In search of perfection" there is a whole treatise on this. Madame had the leg portions, Fred, the brreast. The vegetables were perfection. I had the carre de veau with sweetbreads and again some of the same vegetables. Also divine.

We ordered the cheese tray - very impressive array of cheeses. A delicious Fourme D'Ambert, Lovely Morbier, a nice Livarot and a Brie (from Meaux) that was the perfect gooey consistency with a hint of that funk so important in a well kept Brie. Madame had an aged goat cheese (crottin) and some camembert. Fred kept his selection well hidden, so I don't know exactly what he had.

We did order dessert too, but first they brought a selection of petits fours, and a trio of little sweet things to try, followed by the real desserts. Fred's was the pick of the litter here. A poached pear stuffed with ice cream.... 

There I think that's the 8 courses! 


Saturday, June 11, 2011

Daily bread on the grill

It's summer here in Texas. It shouldn't be yet, but it is very hot. So I have no desire to use the oven. I figured that with some appropriate fiddling I could use my grill as an oven. After all we grill/roast meat, so why not bread?
So, taking a leaf out of the Sullivan St. bakery, I decided that preheating a kind of pan would be the best way to manage the baking process. I have an old cast iron dutch oven about 10" in diameter. So, what kind of dough? What ratios? How long? What temperature. It turns out that it is a pretty simple thing to do and the results have been well worth while.

Ingredients
550 gm bread flour
40gm whole wheat flour
10gm light rye flour
400 gm water
5 gm yeast
2t (yes everything else was by weight!) kosher salt

Method
Proof the yeast in room temperature (or slightly warmer) water. Add to the flours, mix using a spatula until it is shaggy. Cover and leave to stand for about 45 minutes. After it has rested for a while, add the salt and then knead ( 12 minutes speed 4 in kitchenaid mixer). Turn out into a lightly oiled bowl, cover and allow to rise for about 45 minutes. It will almost have doubled. Take the dough out, stretch it, form into a ball and return to the bowl, cover again and leave until doubled.
Once it has doubled in size again, turn on to a lightly floured board and form into a ball. Making sure that the outside of the ball is stretched, forming a skin. Turn the ball seam side up into a round basket lined with floured cheesecloth. Meanwhile heat the grill and a cast iron pan at 450 for at least 30 minutes.
Once the dough has rested and returned to springiness, turn it out into the cast iron pan. Bake on the grill for 450F for 25-30 minutes.
When it is cooked, turn out onto a wire rack and allow to cool.
Enjoy while warm with butter and honey or jam....


Saturday, May 21, 2011

More playing with eggs

When Madame is away, I like to experiment in the kitchen. It keeps me out of trouble, and endlessly entertained. Mostly by failed experiments.

Eggs are a great source for amusement - they are cheap, versatile, tasty (when I don't screw them up too badly), and small enough that you can simple experiments. I also do eat the failures - all though in this case I think I would have preferred not to.
I very much like eggs cooked in their shells for a long time over low temperature. Typically  in the 147-148F range. This is sometimes mistakenly called sous vide - it isn't because there is no vacuum involved. Just cooked for a long time in a water bath. As an aside - try putting raw eggs into a vacuum bag....
One royal pain when dealing with eggs like this was peeling them whole. It takes a long time, as it is quite finicky and therefore delays presentation - unless you do them, peel them and then hold them at temp.

I am a home cook, and like things "a la minute" as opposed to being held - again general statement, some things hold really well, but some don't!

So with all that preamble, I thought it would be interesting to try removing the shell before cooking, and still leaving the egg whole. Acid does that pretty well - so into a vinegar bath went the egg.
It takes about 18 hours for the shell to be removed entirely, leaving a little bouncy sack of eggness. So far so good.

Into the water bath at 148 for 45 minutes. It seemed that all was well - the little sac held together beautifully. Quite encouraging, I thought.

And then I pierced it...

As you can see, nice firm  cooked white and slightly oozy yolks. Just the effect I was hoping for. Straight from water bath to table, stick with knife point, et voila.

However, all is not as rosy as I had hoped. The membrane was tough - like sausage casing tough. So very unappetizing. The egg had absorbed too much vinegar flavor, so wasn't very tasty. Didn't have the lovely silky eggy flavor.  It would have been more at home on English chips!

I guess I will have to find another experiment :-(

Tuesday, May 3, 2011

Seabirdskitchen, NTTV and the Dallas Arboretum

Last Saturday, Madame asked me if I would help the NTTV students during their photo-shoot at the Dallas Arboretum. What visit to a beautiful outdoor spot is complete without a picnic? So with a little creativity we came up with some recipes and a demonstration. The recipes are posted here, and I will update links when the video is available.
The first dish is an adaptation of Jamie Oliver's peppers stuffed with tomatoes recipe from the Jamie at home show. I have done it before and the recipe can be found here. For the shoot, I omitted the pancetta.
You always want to have fried chicken at a picnic too, but I don't like the mess frying makes in the kitchen so was looking for a baked alternative. That recipe is repeated below. Potato salad? Of course - with a two step dressing. And finally a dessert - apple bars with a dollop of ice cream. All of the dishes can be made at home and taken to the picnic with you.
I wanted to make sure there was as little mayonnaise and dairy as possible - after all it gets hot here in Texas and proper refrigeration is crucial to ensuring that people don't get sick.


Baked (fried) Chicken - Total Cost $14, Serves 8

Ingredients
8 bone in, skin on chicken thighs
2 c buttermilk
1T dried orgegano
1T hot sauce (eg Tabasco)
2 c breadcrumbs (I used panko)
2T grated parmesan
2T finely chopped parsley
salt
pepper

Method
Mix together the buttermilk, oregano, hot sauce to make a marinade. Add a little salt. Place the chicken into the buttermilk and leave to coat in the fridge for at least an hour - and up to 12.
Just before taking the chicken out of the refrigerator, turn the oven to 375 and place a rackn in the center.
Mix together the bread breadcrumbs, parmesan and parsley. Take each piece of chicken out of the marinade, shake the excess off, and roll it in the breadcrumb mixture, coating all sides evenly. Lay the chicken pieces skin side up on a wire rack on top of a baking sheet. Bake in the oven for 35-40 minutes - until the crumbs are evenly browned.


Potato Salad- Total Cost $6, Serves 8
Ingredients
3 pound(s) (medium) red-skinned potatoes cut into 1-inch chunks
1/3 cup(s) (distilled)  apple cider vinegar
1 tablespoon(s) grape seed oil
2 teaspoon(s)  spicy mustard r Dijon style if that's what you have
2  teaspoon(s) kossalt
1/2 teaspoon(s) black pepper
1/2 cup mayonnaise
1/3 cup whole milk
2 small celery stalks, thinly sliced
2 green onions, minced
A sprinking of paprika to finish

Method
Put the potatoes and a generous couple of pinches of salt into cold water in a saucepot. Bring to a simmer until the potatoes are just tender.
Meanwhile make the vinaigrette by whisking together the cider vinegar, oil and mustard.
When cooked, drain the potatoes thoroughly and then coat with the vinaigrette while still hot. Allow the potatoes to cool.
Mix the salt, pepper, mayonaise and whole milk together in a bowl, ensuring that the mayonnaise is thoroughly incorporated.
Mix the celery and green onions into the cooled potatoes, pour over the mayonnaise mixture and combine gently.
Serve in a pretty bowl with some paprika sprinkled on top for color

Apple Bars - Total Cost $17, 36 bars

Ingredients
Topping
1 stick butter (slightly softened - not melted)
1 cup walnuts, chopped roughly
1 stick butter
2 cup flour
1 cup light brown sugar
2T vanilla
1 1/2 t ground cinnamon

Filling
4 lbs Granny Smith apples peeled, cored and chopped into 1/3" chunks
3/4 cup raisins
3/4 cup packed brown sugar (light or dark, OK)
2t cinnamon
1/2t all spice
2T corn starch
3T lemon juice

Crust
3 cups all purpose flour
1 cup granulated sugar
pinch table salt
1 1/2 sticks butter (hard, still cold from fridge), cut in small pieces


Method
First, make the topping by combining the ingredients with your hands until they make a cohesive ball. Wrap in cling wrap and refrigerate.

In a large skillet add the applles, sugar, raisins and spices. Cook gently over a low flame until all the liquid has evaporated. You will need to stir occasionally. The apples will retain their texture.

Meanwhile, make and bake the crust. Mix the flour, sugar, and salt, then rub the butter in until the mixture looks sandy. The butter pieces want to be small enough to be invisible on their own. You could use a pastry blender if you prefer, or a couple of short pulses in the food processor.

Lay the crust mixture evenly in a greased 15x10 jelly roll pan, and press it down using the bottom of a glass to compact it and make sure it is even.

Bake in a 350 degree oven for 25 minutes - until the crust is light golden brown. It may form cracks at the surface - do not worry.

When the crust has nearly finished baking, mix the lemon juice and cornstarch together and pour over the hot apples (off heat). stir to allow to thicken.

Take the out of the oven, and while still hot cover evenly with the hot filling. Crumble the refrigerated topping evenly over the filling. Press down lightly, and bake uncovered for around 40 minutes in the 350 oven.

When cooked, remove the pan from the oven, and allow to cool completely. When cool cut the bars while still in the pan.

Serve topped with a spoonful of ice cream (if desired). They are also pretty good plain

Saturday, March 19, 2011

Salad - it doesn't have to be boring

This dish received the "OMG this is fantastic, we must serve it to people" accolade from Madame. For those who have seen previous posts, you will observe that this is about the highest possible. Fortunately it is really easy and, I have to admit, pretty darn' good. As usual, pork fat rules, but if you have reasons for not eating things porcine you could try using browned butter instead of bacon fat.
The salad is served warmed that makes it a little unusual. Even more so, the lettuce is grilled....
Ingredients
4 strips unsmoked bacon cut into thin strips across the grain
2/3 cup balsamic vinegar
1/2 cup halved walnuts
1 t chili powder
2T dark brown sugar
2 hearts of Romaine lettuce, halved lengthwise, root end intact, lightly oiled
2 oz mild blue cheese (e.g. Stilton or Stichelton) cut into 4 equal sized pieces
12 cherry tomatoes
Salt and pepper to taste

Method
Place the bacon in a small skillet and gently fry - until crispy. Add the balsamic vinegar to a small sauce pan, place over medium heat, reduce until it is thickened and a little less than 1/2 its original volume.
When the bacon is cooked, remove it from the pan, and add the walnuts to the drippings. Turn the heat to medium/low and cook gently for about a minute. Sprinkle with chili powder, then turn the heat off and add the brown sugar. Toss to make sure the sugar doesn't burn. When the walnuts are well coated, add  the vinegar reduction to the pan, keep on heat stirring regularly so it doesn't stick.When it is close to time to serve, sprinkle salt and pepper on the oiled leaves and grill cut side down for 30 seconds over high heat. The inner leaves should char slightly.

Serving
Place a grilled heart cut side up on a large plate. Pour the warmed walnut dressing over the lettuce, sprinkle the bacon over the dressing. Place the blue cheese on top of the leaves, scatter some tomatoes on the plate and serve immediately


Wednesday, March 16, 2011

A couple of revelations

This isn't about specific dishes, but about how to get some things to "work". First the dreaded all you can eat buffet. Now I CAN eat a lot, but I shouldn't. So, the question is, "How do I enjoy a buffet without overdoing things?" found a simple answer after eating in Abu Dhabi where almost every meal was a buffet:

Lay the food out as attractively and patiently as you can on the plate. Decide what the plate will look like and organize things on it. Don't simply pile on. If you go for a clean look, you will put less on the plate, it will take longer to do, and it will be more pleasing to look at - and ultimately (I keep telling myself) more satisfying. Also it's good practice for presentations - you get to work on an often neglected part of the food.

Second peeling cooked eggs: I often used almost hard boiled eggs (set white, slightly runny yolks) in the "French Salad" - one of Madame's favourite dishes. In that recipe, I call for cooking the eggs in the potato water. This works really well. But I have also noticed that I have tried to cook eggs by putting them in cold water and gradually bringing to a simmer. Turn the heat off and leave to stand for about 4-5 minutes depending on how much water there is. The eggs cooked by the "start in cold water" method prove really  hard to peel. Those plunged into simmering water are much easier to peel. I haven't figured the science out, but I do know that I will be starting eggs that are intended for peeling in simmering water - not cold.

Tuesday, March 15, 2011

Pi day

On Pi day (3/14 in the USA) it is traditional to make a pie. This year was no exception. I wanted a steak and kidney, but buying kidneys is tricky, so this was steak, onion and mushroom pie. And if I say so myself it was damned good!
Ingredients
2T Beef drippings (or veg oil if no drippings)
1 1/2 lb beef chuck, cut into 3/4" cubes
4 medium onions sliced
1/2 lb mushrooms quartered
1/2 can pilsener beer
6 small yukon gold potatoes, peeled and chopped into 1/4" cubes
Salt/pepper to taste
Cider vinegar (1t or so) to brighten the flavors
1/2 package frozen puff pastry rolled to cover the pie dish
1 egg + 1t water beaten together

Method
The beef drippings are the secret inredient heat them (or the oil) in a dutch oven until smoking. Meanwhile season the meat with salt/pepper. Brown in the hot fat turning once. Set the meat aside.
Into the same pan put the sliced onions and cook until sligtly browned. About 8 minutes stirring occasionally. When the onions are cooked, add the meat and any juices bask into the pan. Pour the beer over the meat. Put the lid on and cook in a 300 oven for almost 2 hours.
Cool the dutch oven, and add the potatoes and onions to the meat/onions. When the meat mixture is cool, place in a pie dish (Pyrex if possible) and cover with the rolled out puff pastry. Make vent holes in the puff pastry. Brush with the beaten egg and place in a 425 oven for 20 minutes - or until evenly brown. Note you may have to rotate it.
After the crust is set, turn the oven down to 300 degrees and cook for 18 minutes - heating up the meat and cooking the potatoes and mushrooms.

Serving
Serve a piece of pie with some simply bolied peas.

Sunday, February 6, 2011

Superbowl beans

Our good friends Rick and Claudia always do a terrific superbowl party. They asked us to bring something - either bbq beans or a green bean casserole. I am not about to do a green bean casserole, so bbq beans it was. Mind you, I had never made any of those before either. However, I had heard that if you want to cook 'em a long time it must be in a slightly acid environment (think molasses, vinegar, brown sugar, etc.). The ingredients are a bit imprecise, but I hope this conveys the gist.
Ingredients
2 lbs pinto beans
Cold water to cover the beans by 2 inches
2T vegetable oil
2 yellow onions diced
2 red peppers diced
1 lb salt pork, gently rendered, fat discarded
3T Paprika
1T Chili powder
1 small can tomato paste
3 Ancho peppers
3 Dried Cayenne peppers
1/2 cup molasses
1/2 cup cider vinegar
1 quart (32 Oz - US quart, not Imperial quart) chicken stock
12 oz brisket bbq trimmings
1/2 cup dark brown sugar
1/4 cup cider vinegar
2 cups boiling water
6 slices smoky bacon, chopped into small strips and fried until crispy, discard the fat
1 red onion minced finely

Method
Pick over the beans making sure there are no small stones or other bad things. Put them in a large bowl and cover with the cold water and leave to soak over night.

The next morning, heat the oil in a frying pan and gently saute the onion and red pepper until soft. Add the paprika and chili powder. Continue to saute for another couple of minutes.

Put the onions and peppers into the bottom of a slow cooker. Add the beans and the rendered salt pork. Fry the tomato paste in the same pan that you cooked the onions/peppers in until it turns a light brown colour. Warm the molasses, and mix with 1/2 the chicken stock and the first addition of cider vinegar. Use this mixture to deglaze the pan with the tomato paste, whisking to incorporate. Add this liquid + the dried peppers to the crockpot. Also add the bbq trimmings and the rest of the stock.

Turn the slow cooker on to the longest (in my case 10 hours) cook time. Check about 1/2 way through, and if the beans are a bit dry looking, make up a mixture of water, cider venegar and dark brown sugar. Stir that in to the mixture and check for the amount of liquid. It should not cover the beans, but should be clearly visible without moving the beans around.

After 10 hours, turn off the slow cooker and leave overnight. It will slowly come to room temp. 5 hours before serving, turn the slow cooker on again at the same setting as before. As the mixture is heating, add the finely diced red onion (raw) and the crispy bacon. Stir well to combine.

When the beans are hot again, they are ready to serve. Note you can add some salt/pepper to taste if you like, but I found the salt pork added just what was needed.

If I were making this again, I would add the beef trimmings in the second (warming) phase. They had given up too much of their flavor adding them so early.

As I said at the beginning, the proportions are just rough estimates. Your mileage may vary. Just remember to keep them with enough liquid, and to make sure there is enough acid to prevent the beans from going mushy.

These proved to be very popular indeed, and accompanied the meats, salads and other goodies that Rick and Claudia served.

Sunday, January 16, 2011

The blender

For several years I have had a jones for a Vitamix blender. Why? They are cool, they are easy to clean, they do a great job... However the birdhouse CFO (aka Madame) has observed quite reasonably that a $600 blender is overkill. However she was resigned to the crappy blenders that have been gracing our kitchen counters and never used them. They were hard to use, heavy, the seals never quite sealed. The cleanup was a pain....
So we were minding our own business in CostCo yesterday (note to self - be more focussed when visiting CostCo). And there we saw the Blendtec blender. Apparently this thing has been advertised all over the internet - but with adblockers, etc. I never saw the commercials. So I was a novice. It looks a bit like the Vitamix. The blade attachment is built in to the "goblet", so no seals to worry about. The goblet is large (1/2 gallon). The blades spin at about mach 0.4 or some such speed. And it is a whole lot cheaper than the Vitamix.

After long engagement with the sales guy, and having tasted many of his concoctions (more interested in the textures than the tastes I have to admit), it seemed that this was the way to go. After consultation with the CFO, raising of a wine cork (what passes for a purchase authorization in our house) we bought it - and the 96 oz goblet as well. Working on the theory that we do make some pretty good sized soups.

Brought it home, opened instructions and it said, "To clean put in 1 cup of hot water 2 drops of detergent and pulse for 5 seconds. Rinse and dry". Hell, I can do that - and did.

The first test was making hot chocolate. Madame and I like our hot chocolate made with the Abuelita chocolate. But doing that in a pan is a PITA because it never completely dissolves. So we heated some milk in the cups (in the microwave) and dumped 2 cups of the hot milk + 1 tablet of chocolate into the blender and pressed the soup setting. This blends slowly at first to break up the chunks, and then very fast so the friction heats the ingredients. So 2 cycles (90 seconds each) at the soup setting and the chocolate was beautifully mixed, no residue, piping hot (and of course the cups were hot too having been used to heat the milk initially). Cleanup - see above! It really was that simple. The hot chocolate was at 183 degrees (thanks instant read thermometer) and slightly foamy. Madame pronounced it the best chocolate ever.

We are able to dispose of three other tools (2 blenders - don't ask and a juicer.) So we have a really effective tool, spent less than we might have done, had a nice bottle of purchase authorization together and cleaned some counter space.

Time and money well spent